Click here for comprehensive tactical doctrine, detailed procedures, and in-depth information beyond this quick reference
Reference: ATP 3-21.8, Infantry Platoon and Squad
PURPOSE
This reference provides the tactical foundation needed to evaluate OCS candidates during field training.
Remember: OCS evaluates LEADERSHIP, not tactical proficiency.
Use this to understand what right looks like so you can assess whether candidates can plan, communicate, and lead their element through tactical situations.
Understanding the organization and capabilities of rifle and weapons squads is fundamental to evaluating platoon operations. These organizations define the organic firepower and capabilities available to the platoon leader.
Infantry Rifle Squad (ATP 3-21.8)
The rifle squad is the primary maneuver element of the infantry platoon. It consists of 9 personnel organized into two fire teams, each led by a team leader.
Position
Quantity
Primary Weapon
Squad Leader
1
M4 Carbine
Team Leaders
2
M4 Carbine with M320 Grenade Launcher
Automatic Riflemen
2
M249 Squad Automatic Weapon (SAW)
Riflemen
4
2× M4 Carbine with M320 Grenade Launcher 2× M4 Carbine
Planning Factor: ~1,400-1,600 rounds of 5.56mm per rifle squad (not including SAW), plus 40mm grenades.
Squads cross-level ammunition based on mission. AT-4s or other anti-armor weapons distributed as needed (typically 1-2 per squad).
Resupply planning accounts for 50% expenditure triggering refit.
Weapons Squad (ATP 3-21.8)
The weapons squad provides the platoon's medium machine gun and anti-armor capability. It does not maneuver independently like rifle squads but provides supporting fires to enable rifle squad maneuver.
When evaluating candidates, assess whether they understand the capabilities and limitations of their available assets. A rifle squad provides organic automatic weapons (M249 SAW) for close combat, while the weapons squad provides sustained suppressive fire (M240B) and anti-armor capability (Javelin). Candidates should task-organize these assets appropriately based on the mission—for example, attaching a M240B team to support a rifle squad assault, or positioning Javelin teams to cover armor avenues of approach.
Section 2: Movement Formations
Formations provide the framework for controlling the squad/platoon during movement. The SL/PL selects formations based on METT-TC, balancing control, flexibility, security, and speed.
Primary formation when enemy contact is possible but not expected
Good all-around security; Flexible; Easy to control
Requires open terrain for proper dispersion
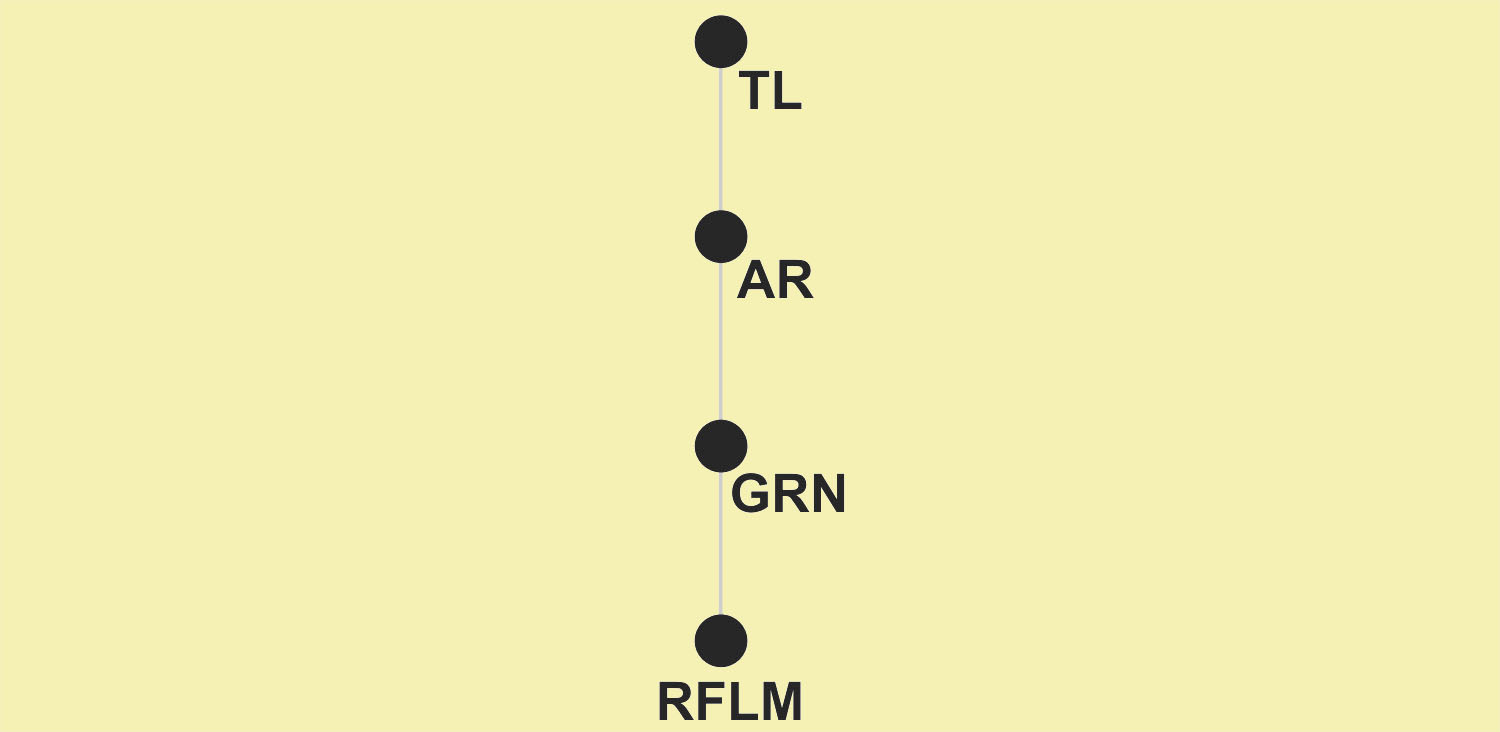
FILE
Restrictive terrain (dense vegetation, urban, trails); Night movement
Easy to control; Good for restricted terrain; Reduces silhouette
Vulnerable to frontal fire; Slow to deploy; Limited firepower forward
LINE
Assaulting an objective; Crossing danger areas; Maximum firepower needed
Maximum firepower to the front; All weapons can engage
Difficult to control; Vulnerable to flanks; Limited flexibility
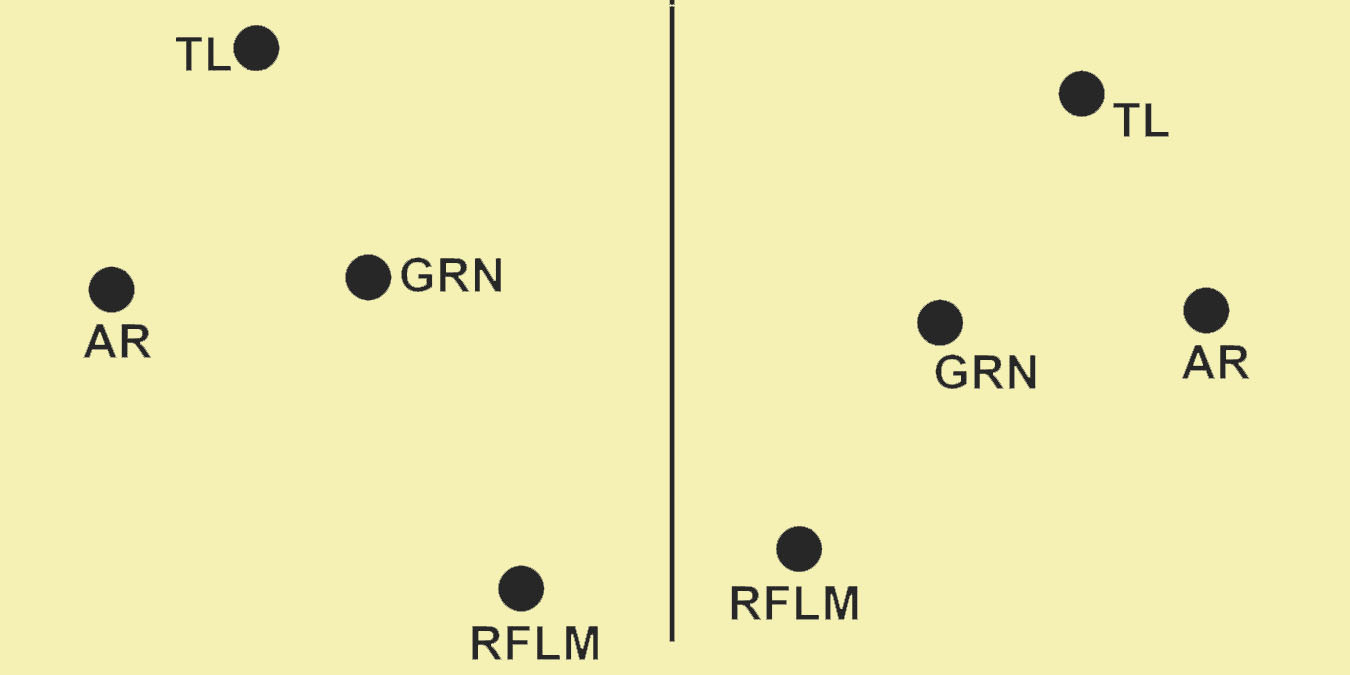
Platoon Formations with Hand and Arm Signals (ATP 3-21.8)
Platoon formations are built from squad formations. The PL positions squads relative to each other based on threat and terrain. Hand and arm signals enable silent communication.
LINE
Max firepower forward
COLUMN/FILE
Easiest to control
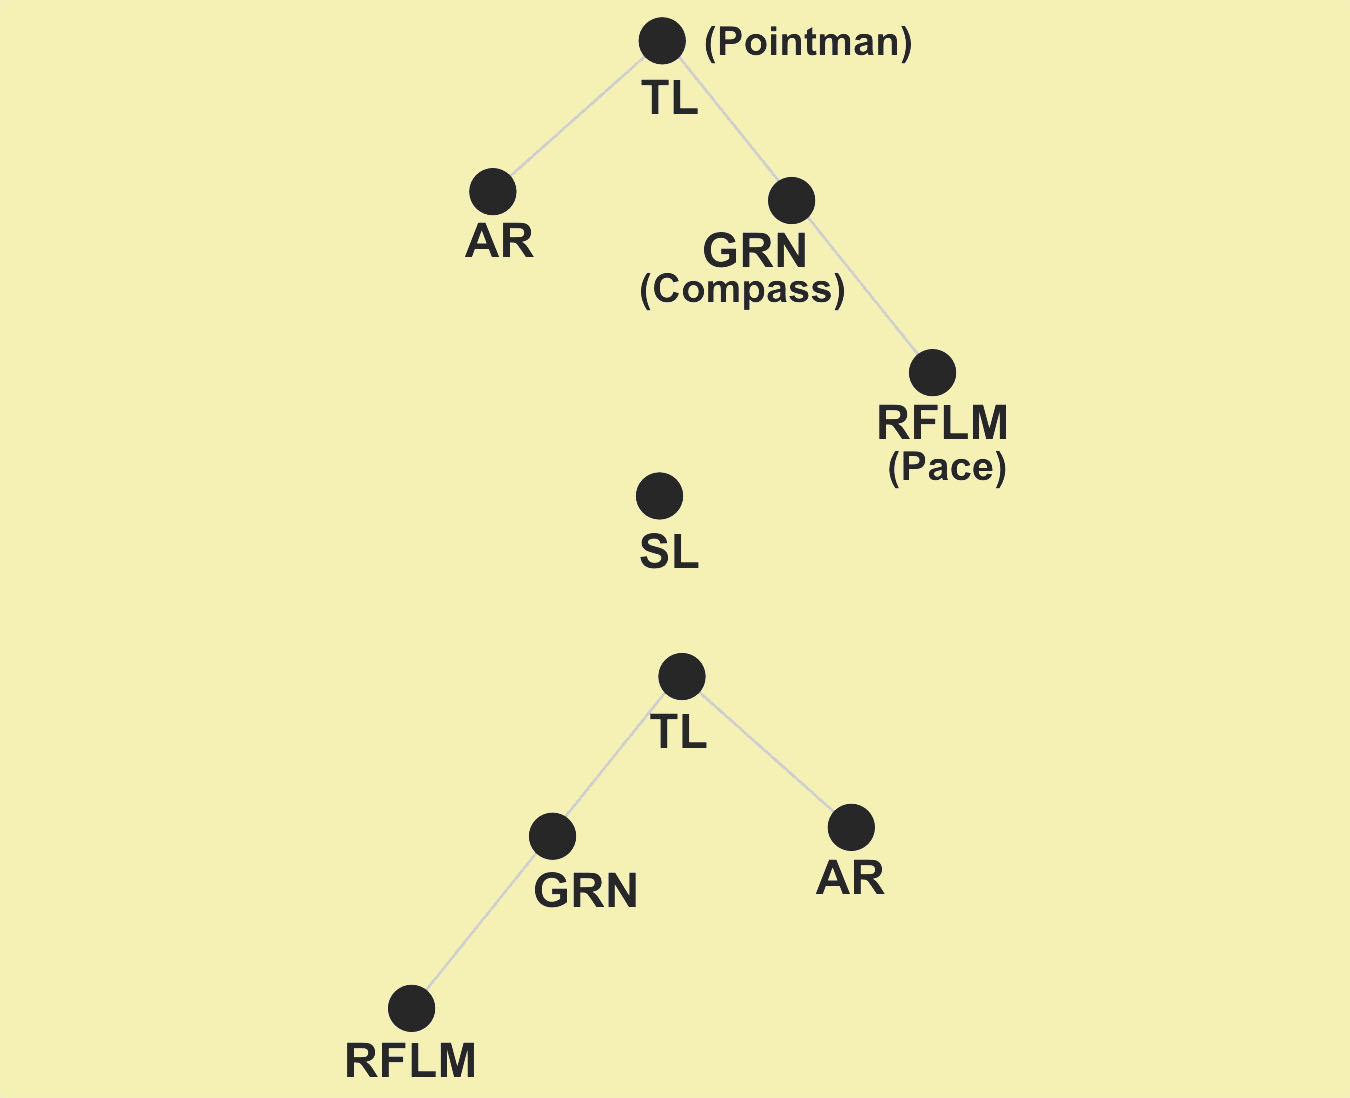
VEE
Contact expected to front
WEDGE
Primary / Situation uncertain
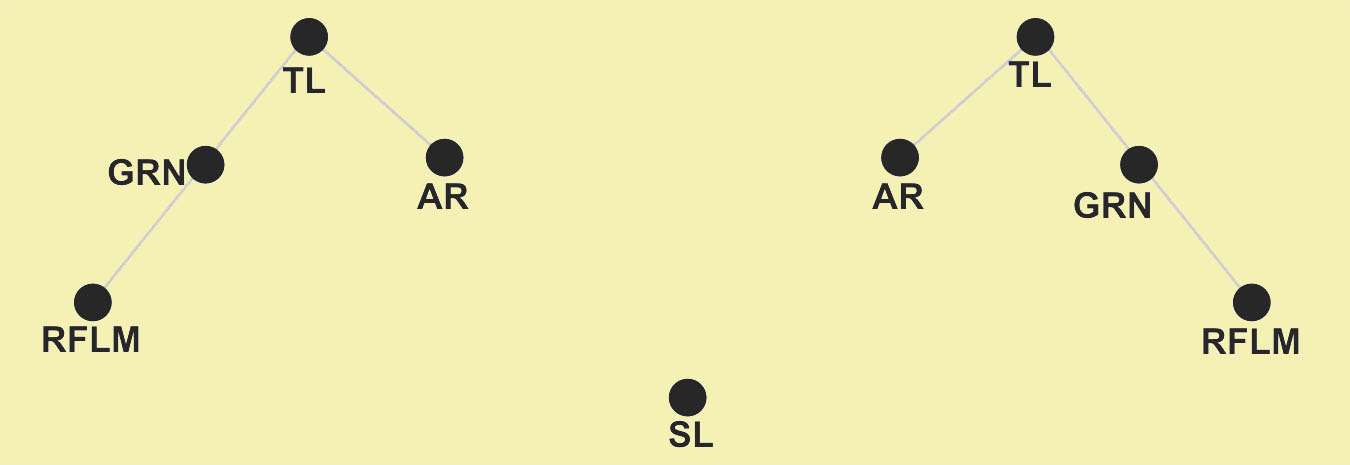
ECHELON (L/R)
Fire to front and flank
BOX
All-around security
Formation
Characteristics
Advantages
Disadvantages
LINE
All elements in a row; Fires oriented forward; One subordinate designated as base
Generate fire superiority to front; Clear large area; Transition to bounding overwatch or assault
Control difficulty in limited visibility; Vulnerable flanks; Slow; Large signature
COLUMN/FILE
One lead element; Fires oriented to flanks; Minimal to front; One route
Easiest to control; Leader can communicate with lead element; Generate maneuver element; Speed
Reduced fire to front; Transitions poorly to assault; Vulnerable to enfilade fire
VEE
Two lead elements; Trail moves between leads; "Reverse wedge"; Two routes forward
Fire superiority to front; Generate maneuver element; Secure flanks; Transition to bounding/assault
Control difficulty in limited visibility or restrictive terrain; Potentially slow
WEDGE
One lead element; Trail elements paired abreast on flanks; Situation uncertain
Control even in limited visibility; Transition to base of fire or assault; Secure front and flanks
Trail elements must clear own path; May need to transition to column in restrictive terrain
ECHELON (L/R)
Elements deployed diagonally; Observation and fire to front and one flank
Assign sectors to front and flank
Difficult to maintain; Vulnerable to opposite flank
BOX
Two lead elements; Trail elements follow leads; All-around security
Same as vee formation
Same as vee formation
Section 3: Movement Techniques
Movement techniques describe HOW elements move relative to each other. The leader selects based on likelihood of enemy contact, need for speed, and terrain.
TRAVELING
Contact NOT likely • FASTEST
TRAVELING OVERWATCH
Contact POSSIBLE • MODERATE
BOUNDING OVERWATCH
Contact EXPECTED • SLOWEST
Technique
Contact?
Speed
How It Works
Dispersion
TRAVELING
NOT likely
FASTEST
All elements move continuously; ~20m between elements
Least
TRAVELING OVERWATCH
POSSIBLE
MODERATE
Lead moves; trail follows at distance that allows support by fire (~50m); Both move continuously
Moderate
BOUNDING OVERWATCH
EXPECTED
SLOWEST
One element MOVES while one OVERWATCHES; Elements alternate; Overwatch provides security
Greatest
Bounding Overwatch Methods
Successive Bounds: Overwatch element moves to a position roughly abreast of the bounding element (more secure, slower)
Alternate Bounds: Overwatch element bounds PAST the bounding element (faster, less secure)
TAC EVALUATION NOTE
When evaluating candidates: Look for the candidate's ability to JUSTIFY their choice of movement technique based on METT-TC, not whether they picked the "right" one. Ask: "Why traveling overwatch here?" A candidate who can articulate threat, terrain, and speed factors demonstrates leadership judgment.
Section 4: Danger Area Crossings
A danger area is any place where the unit is vulnerable to enemy observation or fire. Crossing danger areas is a critical tactical task that requires planning, control, and security.
Fields, meadows, parking lots - large areas without cover; may require detour
ENEMY AREAS
Known or suspected enemy positions, obstacles, minefields
Linear Danger Area Crossing Procedure
Sequence: (1) Halt at near-side RP, establish security → (2) Recon crossing site → (3) Post far-side security FIRST → (4) Main body crosses to far-side RP
Designate near/far side rally points – Where element halts before crossing; where it assembles after
Secure the near side – Element halts in covered/concealed position; establishes local security
Reconnoiter the crossing site – Leader or recon team moves to edge; observes far side; confirms no enemy
Post far-side security – Send security element across first; they establish overwatch positions
Cross the danger area – Main body crosses quickly (usually buddy teams); maintain dispersion
Secure the far side – Element consolidates at far-side rally point; accounts for personnel/equipment
Continue movement – Once consolidated and secure, resume mission
Key Points for Evaluation
Did the candidate designate rally points BEFORE crossing?
Was far-side security established BEFORE the main body crossed?
Did the candidate maintain control and accountability throughout?
Was the crossing executed with appropriate speed and dispersion?
Section 5: Battle Drills
Battle drills are standardized collective actions rapidly executed without a deliberate decision-making process. Soldiers execute drills instinctively based on training. Per CMP: "WTBDs were previously taught and tested in basic combat training. There is no requirement to reteach these tasks in OCS."
React to Direct Fire Contact While Dismounted (Battle Drill 1A)
Situation: Squad receives direct fire from enemy while moving dismounted
Actions:
Soldiers immediately return fire and take cover
Team leaders locate and identify enemy position (direction, distance, description)
Squad leader reports contact to platoon leader using SALUTE format
Squad establishes base of fire to suppress enemy
Squad leader assesses situation and directs action (assault, maneuver, or break contact)
On order, squad executes follow-on action
React to Contact (Battle Drill 2)
Situation: Element receives fire from enemy
Actions:
Soldiers immediately return fire and take cover
Team/Squad leaders locate and report enemy position (direction, distance, description)
Leaders assess situation and direct fires
SL reports contact to PL using SALUTE format
Element suppresses enemy; prepares for follow-on actions (assault, break contact, etc.)
Break Contact (Battle Drill 3)
Situation: Element must disengage from enemy (outmatched, mission requires withdrawal)
Actions:
Leader gives command to break contact and direction of movement
Covering element suppresses enemy with heavy volume of fire
Bounding element moves to covered position to rear (uses terrain, smoke)
Bounding element sets and provides suppressive fire
Elements alternate bounds until contact is broken
Consolidate at rally point; account for personnel/equipment
React to Ambush (Battle Drill 4)
KEY CONCEPT: Response depends on whether ambush is NEAR or FAR
NEAR AMBUSH (within hand grenade range, ~35m) — TC 3-21.76, Battle Drill 07-3-D9502:
Soldiers IN the kill zone immediately return fire, throw fragmentation grenades, and assault through the ambush position
No orders are given — this is an immediate action drill; speed and violence of action are the only chance of survival
Soldiers OUTSIDE the kill zone identify enemy positions and provide suppressive fire; shift fires as the assault element moves through
Assault continues through the enemy position to the far side; element consolidates and reorganizes
SL reports to PL; element prepares for follow-on actions
FAR AMBUSH (beyond hand grenade range, >35m):
Soldiers IN the kill zone immediately return fire, seek cover, and suppress the enemy position
Soldiers OUTSIDE the kill zone maneuver to a support-by-fire position or flank the enemy
SL reports to PL (SALUTE); leader assesses the situation
Leader directs follow-on action: assault the ambush position or break contact (based on METT-TC)
If assaulting: support element suppresses while assault element maneuvers to destroy the enemy
If breaking contact: execute Battle Drill 3 (Break Contact) — elements alternate bounding to the rear under covering fire
TAC EVALUATION NOTE — REACT TO AMBUSH
React to Ambush is the most likely inject during movement phases. Evaluate the candidate on:
Near ambush: Did soldiers in the kill zone assault through WITHOUT waiting for orders? The PL should NOT need to give a command — this is a trained response.
Far ambush: Did the leader make a decision (assault or break contact) rather than freezing? Either option can be correct — evaluate the reasoning.
Fire control: Did the candidate ensure soldiers outside the kill zone provided effective suppression and shifted fires to avoid fratricide?
After action: Did the candidate consolidate, account for personnel, treat casualties, and report?
Knock Out a Bunker (Battle Drill 5)
Situation: Element identifies enemy bunker during movement
Actions:
Element reacts to contact; suppresses bunker
SL reports, evaluates situation, maneuvers team to flank
Support element maintains suppressive fire on bunker
Assault element approaches from blind side/flank
Assault element destroys bunker with grenades and fire
Element consolidates and reorganizes
Enter and Clear a Room (Battle Drill 6)
Situation: Team must clear a room during urban operations
#1 buttonhooks left, #2 crosses right Clear corners → center
Actions:
Team stacks on entry point
#1 soldier enters first, moves to first corner and clears to center
#2 soldier enters, moves opposite direction, clears to center
#3 and #4 enter and clear remaining corners
Team leader announces "CLEAR" when room is secure
TAC EVALUATION NOTE
For battle drills, evaluate the candidate's ability to: (1) Recognize the situation requiring the drill, (2) Issue clear, concise commands, (3) Maintain control throughout execution, and (4) Consolidate and account for personnel after the action. Perfect tactical execution is NOT the standard—leadership under pressure IS.
Section 6: Actions on the Objective
This section covers the basic framework for offensive operations that candidates will plan and execute during FLX. The candidate must demonstrate understanding of the purpose and organization of each element.
Basic Offensive Framework
Element
Purpose
Typical Tasks
SUPPORT BY FIRE
Fix and suppress enemy; Prevent enemy from repositioning or reinforcing
Establish base of fire; Suppress enemy positions; Shift fires on signal
ASSAULT
Close with and destroy the enemy; Seize the objective
Maneuver to assault position; Assault through objective; Clear enemy positions
SECURITY
Protect the force; Provide early warning of enemy
Establish ORP security; Cover flanks/rear during assault; Screen withdrawal
Objective Rally Point (ORP) Procedures
The ORP is the last covered and concealed position before the objective where the patrol halts to finalize preparations.
Occupation: Typically 200-400m from objective; Establish 360° security; Account for personnel
Leader's Recon: PL takes key leaders forward to confirm objective location and finalize plan
Final Preparations: Issue final guidance; Conduct rehearsals; PCC/PCI
Departure: Elements depart on time; Move to assault/support positions
Consolidation and Reorganization
After seizing the objective, the element must secure the position and prepare for the next mission.
CONSOLIDATION (security):
Establish hasty defensive positions facing likely enemy avenues of approach
Position crew-served weapons to cover key terrain
Establish observation posts and listening posts as needed
REORGANIZATION (sustainment):
Account for all personnel and sensitive items
Treat and evacuate casualties
Redistribute ammunition and supplies
Process EPWs and captured equipment
Report to higher (SALUTE, ACE)
Section 7: Ambush Operations
The ambush is one of the primary STX lane missions for OCS candidates. It is a surprise attack from a concealed position on a moving or temporarily halted target. Understanding ambush types, formations, and execution sequence is critical for evaluating whether candidates can plan and lead this operation.
Executed when a patrol makes unexpected visual contact with an enemy force and has time to set up without being detected. Relies on rehearsed SOPs and hand/arm signals — no formal order is issued.
Deliberate
Conducted against a specific target at a predetermined location. Requires detailed planning, rehearsal, and coordination. The leader needs intelligence on enemy size, composition, route, and timing.
By Deployment
Point
All elements deployed to cover a single kill zone. Most common at the squad/platoon level in STX lanes.
Area
Multiple point ambushes around a central kill zone. Elements engage targets simultaneously or sequentially. Typically company-level or above.
Ambush Formations (TC 3-21.76)
Assault and support parallel to enemy route. Simplest form. Used in close or open terrain.
Short leg delivers enfilade fire. Effective at road bends and trail junctions.
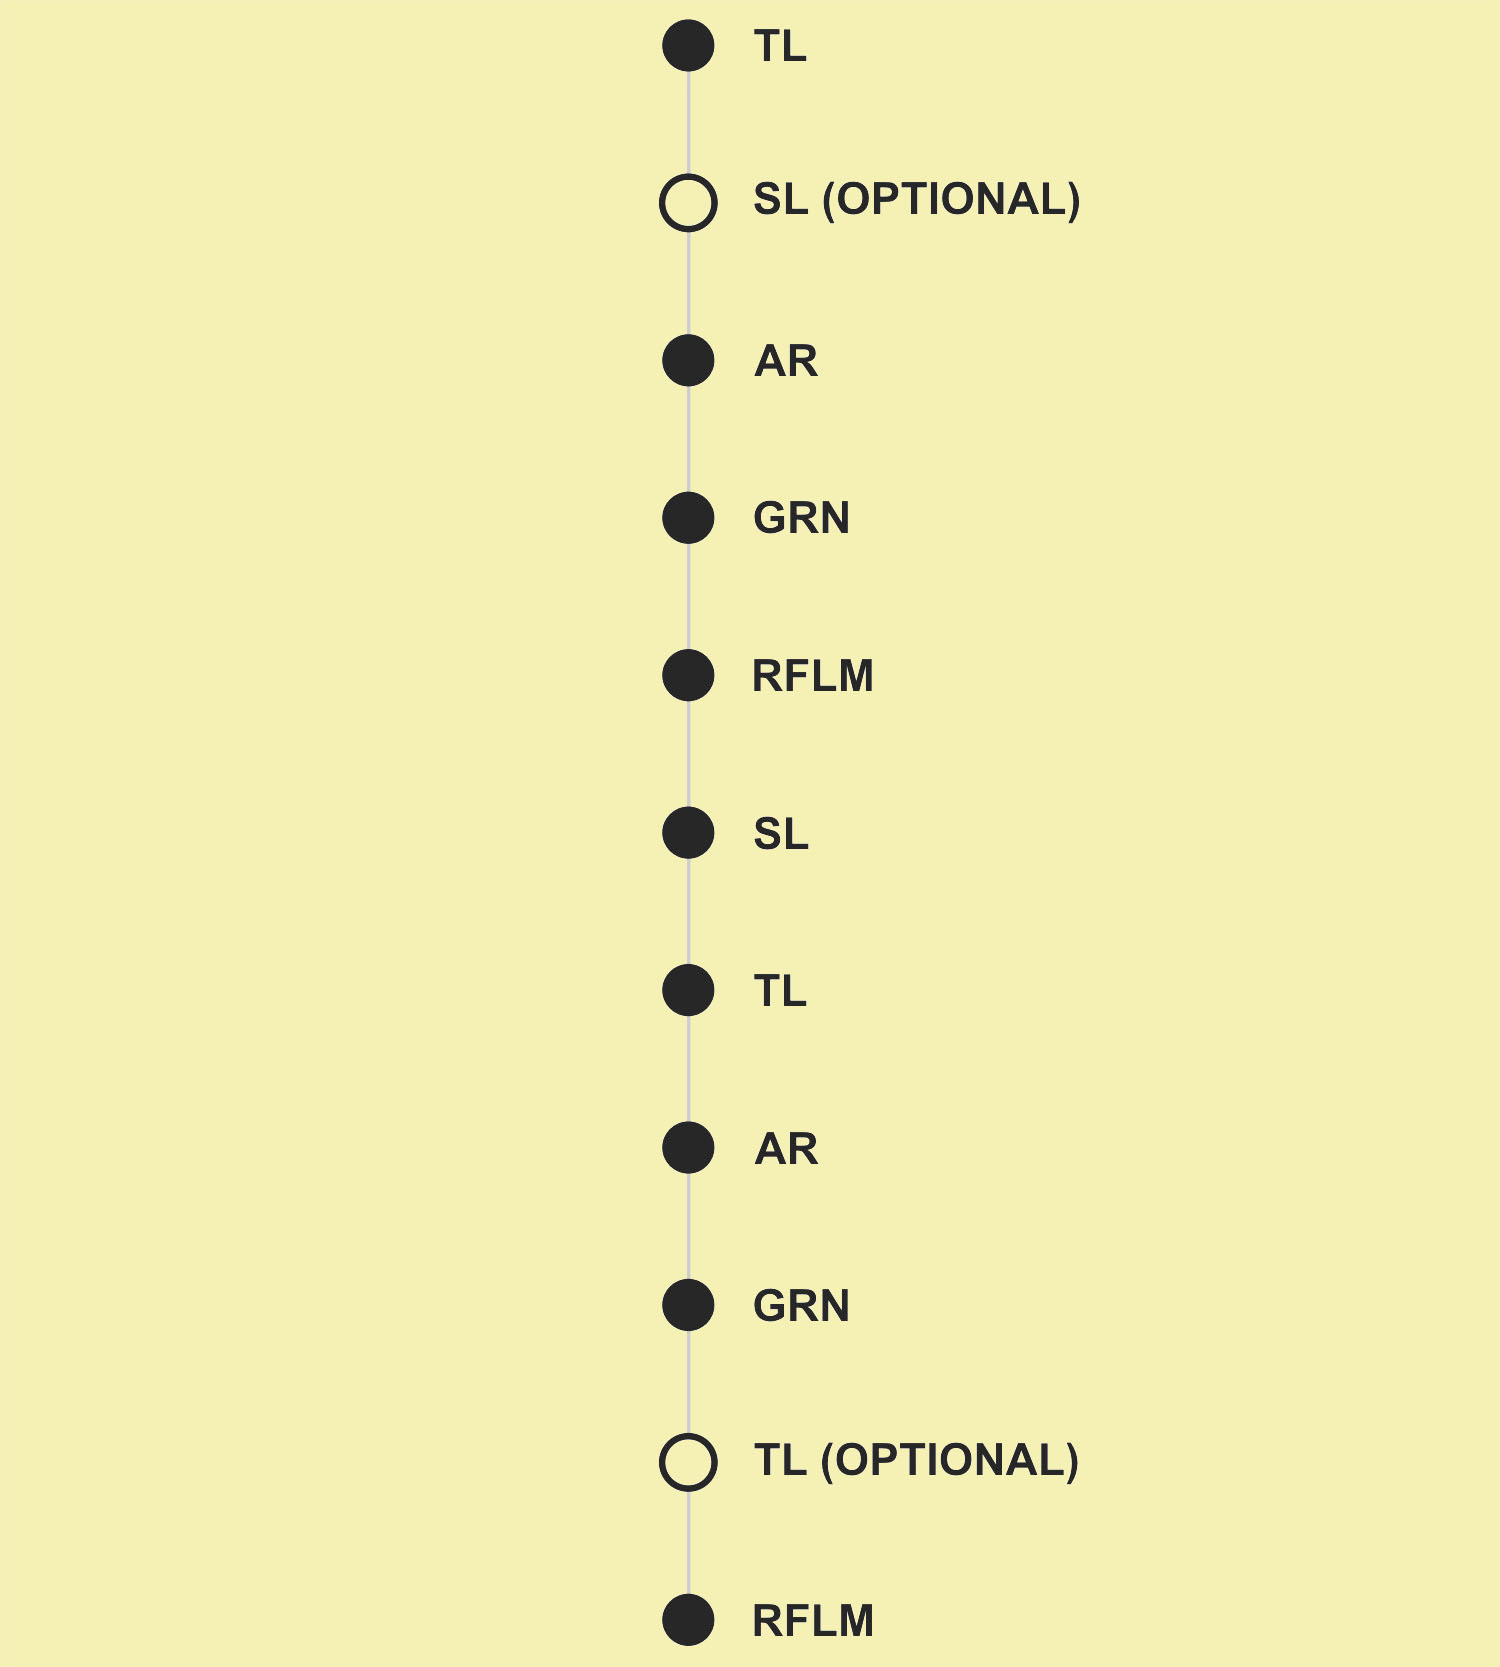
Deliberate Ambush Sequence (TC 3-21.76)
The deliberate ambush is the primary ambush type used in STX lanes. The sequence below follows the Ranger Handbook methodology.
#
Step
Key Actions
1
Secure & Occupy ORP
Patrol halts 200-400m from the objective. Establish 360° security. Account for personnel. Disseminate information.
2
Leader's Recon
PL takes key leaders forward to confirm the kill zone, select positions for assault/support/security elements, and finalize the plan. Pinpoint the kill zone, SBF position, and withdrawal route.
3
Emplace Security
Security element departs ORP first. Establishes OPs on flanks and along enemy avenues of approach to isolate the kill zone and provide early warning.
4
Emplace Support
Support element moves to SBF position. Orients weapons on the kill zone. Establishes sectors of fire and TRPs. Confirms communication with PL.
5
Emplace Assault
Assault element occupies concealed positions along the kill zone. Emplaces obstacles/claymores if available. Sets the LOA (limit of advance). The assault element is the last element emplaced and the first to withdraw.
6
Initiate Ambush
PL initiates on signal (command-detonated device, key weapon, or command). Entire kill zone must be covered by fire. All elements engage simultaneously.
7
Assault Through
Support shifts or lifts fires on signal. Assault element assaults through the kill zone to the LOA. Clears enemy positions. Collects EPWs and PIR.
8
Consolidate & Reorganize
Establish hasty defense on the LOA. ACE report. Treat casualties. Conduct hasty search of enemy personnel and vehicles. Collect PIR items.
9
Withdraw
Withdrawal by echelon: Assault first, then Support, then Security last. Elements collapse to the ORP. Account for all personnel and sensitive items. Report to higher.
Hasty Ambush (TC 3-21.76)
A hasty ambush is triggered when the patrol detects an enemy force and can set up without being detected. There is no time for a formal order — execution relies on previously rehearsed SOPs.
Patrol detects enemy; PL is notified via hand and arm signals
Patrol halts, remains motionless
PL gives the signal for hasty ambush left or hasty ambush right (direction relative to direction of march)
Elements move to covered and concealed positions; security moves to flanks
PL establishes the kill zone and control measures
PL initiates and controls the ambush
PL directs hasty search; patrol consolidates, reorganizes, withdraws, and reports
TAC EVALUATION NOTE — AMBUSH OPERATIONS
Ambush operations test multiple TLP steps simultaneously. Key evaluation points:
Planning: Did the candidate identify the kill zone, assign elements by function (assault/support/security), and develop a withdrawal plan?
Emplacement order: Security first, then support, then assault. Withdrawal is the reverse. Did the candidate get the sequence right?
Control: Did the candidate maintain positive control of initiation? Premature initiation or loss of fire discipline is a critical failure point.
Actions on the objective: Did the assault element assault through to a limit of advance? Did support shift/lift fires on signal?
Withdrawal: Did the candidate plan and execute an orderly withdrawal by echelon back to the ORP?
Common candidate errors: Failing to establish security first; no clear initiation signal; support element not in position before assault element; no LOA designated; forgetting to plan withdrawal; poor consolidation/reorganization.
Section 8: Connecting Tactics to the FLER
The Field Leadership Evaluation Report (FLER) evaluates candidates on the 8 TLPs, not tactical execution. Understanding how tactical tasks connect to TLP evaluation helps focus your assessment.
TLP Step
What to Observe in Tactical Context
1. Receive the Mission
Does candidate analyze enemy, mission, and time available? Do they conduct a proper back-brief?
2. Issue Warning Order
Does candidate provide timely WARNO with mission, timeline, and specific guidance to subordinates?
3. Make Tentative Plan
Does candidate develop a COA addressing scheme of maneuver, formations, movement techniques, and actions on objective?
4. Initiate Movement
Does candidate conduct initial inspections? Begin movement to position the element? Execute contingency plans?
5. Conduct Recon
Does candidate confirm/deny key assumptions about terrain, enemy, and objective? Update plan based on recon?
6. Complete the Plan
Does candidate finalize scheme of maneuver, task organization, and control measures based on recon findings?
7. Issue the Order
Does OPORD include clear situation, mission (stated twice), execution with scheme of maneuver, and command/signal? Uses terrain model?
8. Supervise/Assess
Does candidate conduct rehearsals, PCC/PCI, and maintain control throughout execution? Adjusts plan as situation develops?
BOTTOM LINE FOR TACS
You don't need to be an infantry expert to evaluate OCS candidates. You need to understand enough about tactical operations to assess whether the candidate can
PLAN (develop a coherent scheme of maneuver),
COMMUNICATE (issue clear orders and guidance), and
LEAD (maintain control and adapt during execution).
The FLER evaluates TLPs—tactical tasks are simply the vehicle for demonstrating leadership.
Section 9: Occupying a Combat Outpost (COP)
PURPOSE: This section provides a phase-by-phase overview of the FLX tactical operation for TAC reference during execution. It is not a substitute for the OPORD — it is a quick-scan guide to what should be happening in each phase and what to evaluate. Tactical fundamentals for each phase are covered in Sections 1–8 of this guide.
1st Platoon, A/4-211 IN conducts a tactical road march from the RTI through two checkpoints to seize and occupy COP Seggel, a recently vacated host nation facility. Upon clearing the facility, the platoon establishes the company command post, transitions to a defensive posture, and prepares to execute follow-on missions issued as FRAGOs from the COP.
Operation Phases at a Glance
Phase
Key Tasks
Transition Criteria
See Also
1 — Approach
SP from RTI; tactical road march through CP ANVIL and CP FORGE
Select formations and movement techniques appropriate to terrain and threat
Execute danger area crossings with security
Conduct security halts; report at each checkpoint
Security halt established vicinity COP Seggel; PL initiates leader's reconnaissance
Sections 2, 3, 4
2 — Clear
Leader's recon of facility to confirm/deny enemy presence
Assault element clears all buildings room-by-room
Support by fire element fixes enemy
Security element cordons against reinforcement and escape
Report "CLEAR" to higher
All buildings cleared; no enemy presence in facility
Sections 5 (BD6), 6
3 — Occupy & Establish
Establish ECP with positive identification procedures
Perimeter security with fighting positions and overhead cover
Company CP with battle tracking and dual-net communications
CP operational report to higher; all sectors manned; ready for follow-on FRAGOs
Section 6
4 — Sustained Ops
Execute follow-on missions issued as FRAGOs from COP
Maintain security posture; respond to enemy probes and indirect fire
SITREP every 4 hours; LACE reports every 12 hours
Manage rest plan and QRF rotation
ENDEX or relief by follow-on forces
Section 8
TAC EVALUATION NOTES — BY PHASE
Phase 1 (Approach): Does the PL select appropriate formations and movement techniques for the terrain? Are danger area crossings executed with proper near/far side security? Does the PL report at checkpoints and maintain communication with higher?
Phase 2 (Clear): Does the PL conduct a leader's recon before committing the main body? Is the clearing systematic — does the candidate maintain control of support, assault, and security elements simultaneously? Are cleared rooms marked?
Phase 3 (Occupy & Establish): Can the PSG/PL establish a functioning CP? Is battle tracking active? Are comms operational on both platoon and company nets? Is the rest/security plan realistic for 48-hour operations?
Phase 4 (Sustained Ops): Does the candidate demonstrate full TLPs when receiving a FRAGO? Can they plan and issue a new order from the CP? Do they maintain defensive posture while planning follow-on missions?
BOTTOM LINE FOR TACS
The FLX tests the full spectrum of TLPs under sustained conditions. Phases 1–2 evaluate planning and execution of offensive tasks (movement, clearing). Phases 3–4 evaluate the transition to defense, CP operations, and the ability to receive and execute follow-on missions — the hallmark of a functioning platoon leader.
Section 10: Radio Operations and Communications Procedures
Connects to: Phase 3 dual-net communications requirement
PACE plan structure and employment (Primary: FM radio, Alternate: FM alternate freq, Contingency: single-channel plain text, Emergency: runner)
RTO procedures: call signs, prowords ("this is," "over," "out," "roger," "wilco"), phonetic alphabet, authentication using number combination
Net discipline: brevity, no names over the net, proper call sign usage, listen-before-transmit
Dual-net operations: monitoring both platoon and company nets simultaneously — this is required during Phase 3 CP operations
For this FLX: Candidates must establish comms on two nets (company FH and platoon FH) and demonstrate proper checkpoint reporting during the road march and SITREP/LACE reporting from the COP
Section 11: OE-254 Antenna Setup and Employment
Connects to: Phase 3 CP establishment
Components: 4 fiberglass mast sections, ground plane (4 radials), AB-652 base, guy wires (3), stakes, coax cable to radio
Assembly sequence: lay out ground plane radials → assemble mast sections → attach antenna element → connect coax → raise mast → tension guy wires → stake and ground
Site selection: highest available ground near the CP, clear of overhead obstructions (trees, power lines), within coax cable reach of the radio, away from other antennas to avoid interference
Orientation: the antenna is omnidirectional when vertical — key concern is ensuring it is plumb (straight up) for even radiation pattern
Guy wire tensioning: equal tension on all 3 guy wires at 120° intervals; stakes at approximately 2/3 the mast height distance from the base
Troubleshooting: weak signal often means a loose coax connection, improperly grounded base, or mast not plumb; check connections before assuming radio fault
For this FLX: The OE-254 extends FM range to reliably reach higher HQ from the COP. Candidates should demonstrate they can get the antenna up quickly during Phase 3 occupation so the CP is operational
Section 12: Entry Control Point (ECP) Operations
Connects to: Phase 3 ECP establishment
ECP layout: overwatch position with clear line of fire, covered search area, separate vehicle and pedestrian lanes where possible, barriers or obstacles to slow and canalize traffic
Manning: minimum 3 personnel — one on overwatch (armed, covering the search area), one conducting the search/check, one logging and providing backup
Positive identification: challenge/password procedures, visual ID checks, search vehicles and personnel using a systematic 5-point or full pat-down method
Escalation of force: Shout (verbal warning) → Show (display weapon) → Shove (physical measures) → Shoot (lethal force as last resort). Each step must be clearly understood
Documentation: maintain a log of all personnel and vehicles entering/exiting with time, name/description, purpose, and any items of interest
ROE with civilians: host nation personnel may be present at COP Seggel — treat respectfully, identify, report to higher. Positively identify targets before any use of force
For this FLX: The ECP is established on Bradenton Avenue during Phase 3. Candidates use the OPORD's challenge ("Outpost") and password ("Seggel"). Cadre may send civilian role-players to test ECP procedures and ROE compliance
Section 13: Security and Defensive Planning
Connects to: Phase 3 perimeter security; See Section 6
Priorities of work (in order): security first, then fighting positions, wire/obstacles, fields of fire, alternate positions, range cards/sector sketches, rehearsals, rest plan
Sector sketch: drawn from the leader's position looking out; includes squad/team boundaries, primary and alternate fighting positions, key terrain features, TRPs (target reference points), FPL (final protective line), dead space, and obstacles
Fighting positions: hasty positions immediately on occupation, then improve to deliberate positions with overhead cover, grenade sumps, and drainage; interlocking fields of fire between adjacent positions
Observation plan: LP/OPs pushed out along likely avenues of approach; establish communication (wire, radio, or signals) back to the perimeter; cover dead space with observation or indirect fire
Stand-to: 100% security at dawn and dusk (BMNT/EENT) — the most likely times for enemy attack. Duration typically 30 minutes before to 30 minutes after
QRF: a designated element (typically a fire team or squad) on short-notice alert to reinforce any sector under attack; must know routes to every sector and rehearse responses
Rest plan: for 48-hour sustained operations, must rotate 1/3 security, 1/3 improving positions, 1/3 rest — realistic scheduling is critical
For this FLX: COP Seggel's most dangerous avenues of approach are from the north and west. The OPORD expects defensive fires oriented on the Bradenton Avenue corridor and western woodlines. REAPER probing attacks at first light are the expected threat
Section 14: Satellite Imagery and Terrain Analysis
Connects to: Phase 1 route planning; Phase 3 defensive layout
Reading satellite imagery: identify buildings, roads, tree lines, open areas, water features; understand scale and orientation (north arrow); distinguish between current and outdated imagery
OAKOC framework:
Observation & Fields of Fire: Where can you see from? Where can you shoot from? Where are the blind spots?
Avenues of Approach: How can the enemy get to you? How can you move to the objective?
Key Terrain: What ground gives an advantage to whoever controls it? (high ground, road junctions, hardened buildings)
Obstacles: What restricts movement? (dense vegetation, water, fences, structures)
Cover & Concealment: Cover stops bullets (walls, berms); concealment hides you (vegetation, shadows) — they are not the same thing
Correlating imagery to grid: match visible features (road intersections, buildings) to the map; use known grid references to orient; overlay grid lines if possible
Facility layout proposal: using the imagery, candidates should be able to propose placement of the CP, ECP, CCP (casualty collection point), and HLZ (helicopter landing zone) and explain why each location was chosen based on terrain
For this FLX: COP Seggel sits in a developed area with Bradenton Avenue as the main MSR, dense pine/hardwood forest to the west, and open terrain along Jacksonville Street to the north. Candidates should recognize the key terrain features and orient their defensive plan around them
Section 15: Battle Tracking and Command Post Operations
Connects to: Phases 3–4 CP operations
Battle tracking board: a map or imagery with current friendly positions (by squad/team), known/suspected enemy positions, key control measures (phase lines, checkpoints, boundaries), and a timeline of events. Updated in real time as reports come in
CP layout: the CP needs a battle tracking board visible to the PL/PSG, radios on both nets within arm's reach, a message log, and a working area for planning. It should be inside a hardened structure for protection
Tracking friendly forces: know where every element is at all times — squad locations, casualty status, ammunition status, security posture. If you can't point to a squad on the map, you've lost track
Tracking enemy: plot all SALUTE reports on the board; look for patterns (direction of movement, timing of contact, likely staging areas)
Running estimates: maintain current counts for personnel (effective strength by squad), Class V (ammo by type), and Class I/water (remaining supply vs. consumption rate). Update with every LACE report
Processing reports: when a report comes in, the CP logs it, posts it to the board, determines if it triggers a CCIR or requires action, and passes it to higher if required
Transition from movement to static: during Phase 1-2, the PL leads from the front; in Phase 3, the PL/PSG must shift to leading from the CP — this is the hardest leadership transition for candidates and the one most likely to fail
For this FLX: The company CP is established in a hardened building at COP Seggel. The OPORD requires SITREP every 4 hours and LACE every 12 hours. Candidates must demonstrate they can receive a FRAGO at the CP and conduct TLPs to issue a new order — this is the Phase 4 evaluation focus
Section 16: MEDEVAC 9-Line Request
Line
Item
Information Required
1
Location
Grid coordinates of pickup site (8-digit preferred)
2
Frequency / Call Sign
Radio frequency and call sign at the pickup site
3
Patients by Precedence
A — Urgent | B — Priority | C — Routine
4
Special Equipment
A — None | B — Hoist | C — Extraction | D — Ventilator
5
Patients by Type
L — Litter | A — Ambulatory
6
Security at Pickup Site
N — No enemy | P — Possible | E — Enemy in area | X — Armed escort required
7
Marking Method
A — Panels | B — Pyrotechnic | C — Smoke | D — None | E — Other
8
Patient Nationality / Status
A — US Military | B — US Civilian | C — Non-US Military | D — Non-US Civilian | E — EPW